Whipped shea butter is a luxurious, nourishing product used for so many different things. And It’s also easy to make! It’s easy to whip up this natural beauty product at home, as long as you know-how!
This post will walk you through how to whip raw shea butter and how to use it in your daily life.
If you are looking for a natural moisturizer that is also good for your skin, shea butter can be the answer. But before you can get to all of its benefits, you have to get the shea butter whipped.
This process is so simple and will give your shea butter that light, airy texture that is just perfect for use in face masks or other skin care recipes! Here’s how to whip raw shea butter!
Benefits of Whipping Your Shea Butter:
There are several benefits to whipping your shea butter. Let’s have a look at some of them.
- It makes the butter easier to use. When it is whipped, the shea butter becomes light and fluffy, making it much easier to spread on your skin. This is especially important if you are using it as a moisturizer.
- Shea butter that has been whipped is less likely to clog pores. The airy texture created by whipping helps the skin absorb the product more efficiently, which means there is less chance for it to clog pores or cause breakouts.
- Shea butter that has been whipped is also better at retaining moisture. The lighter texture allows the moisture to be absorbed more quickly and thoroughly, keeping your skin hydrated longer.
- It allows you to easily incorporate the healing properties of this natural product into other recipes, like soaps and lotions.
How to Whip Raw Shea Butter the Right Way
Once shea butter has been whipped, it can be used in various applications. It makes an excellent moisturizer and can also be used to treat stretch marks, eliminate scars, and repair your hair!
To whip the shea butter successfully at home, you will need:
Read: Shea butter for hair at clicks
Materials Needed:
- Raw or Unrefined Organic Shea Butter (You will get better results with unrefined)
- A microwave-safe bowl (I use a glass measuring cup)
- Hand mixer or stand mixer with beaters (or you can substitute in an electric whisk if that’s what you have!)
- A bowl (preferably one with a spout)
Step By Step Instructions: How to Whip Raw Shea Butter
Step 1: Cut The Shea Butter Into Small Pieces:
The first thing you need to do is cut the shea butter into small pieces. You can use a knife to chop the butter up into small, even chunks.
If you are using a bar or block of shea butter, you can use a cheese grater to break it down into smaller pieces quickly.
This will help it to melt more quickly.
Read: Shea butter benefits
Step 2: Melt The Shea Butter in a Microwave-Safe Bowl or Double Boiler
Place the shea butter into your glass bowl and put that bad boy in the microwave for about 30 seconds. Be sure not to overheat the shea butter when melting it!
If it becomes too hot, you run the risk of ruining the integrity of the butter and reducing its effectiveness.
You can also melt shea butter using a double boiler if you don’t have a microwave. To do this, place a small saucepan filled with water on the stovetop and set it to medium heat.
Place your bowl of shea butter on top of the saucepan, making sure that the bottom of the bowl doesn’t touch the water. As the water temperatures heat up, it will melt the shea butter.
Step 3: Add A Little Oil To The Shea Butter
This is an optional step, but I always like to add a little oil to my shea butter when whipping it because it helps make it even fluffier!
If you have a preferred oil to use, go ahead and add 1-2 teaspoons of it to the melted shea butter. I usually just use coconut oil, but you can use any type of oil that you want.
Step 4: Whip The Shea Butter Into A Creamy Substance
Now it’s time to whip that shea butter into a creamy substance! This is where your hand mixer or stand mixer with beaters will come in handy.
If you don’t have either of those, no worries – you can use an electric whisk instead.
Start whipping the shea butter at a medium speed and gradually increase the speed as it starts to become creamier.
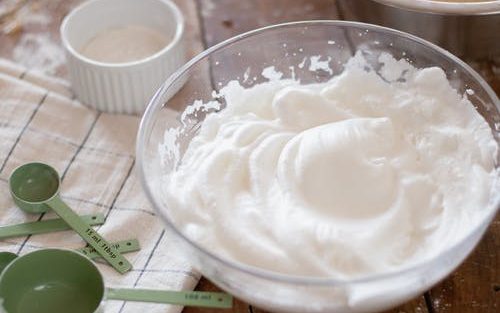
You should continue whipping until the shea butter has doubled in size and has a light, fluffy texture. This should take about 5-7 minutes.
Step 5: Store Your Shea Butter In A Container
Once your shea butter has been whipped into a creamy consistency, you can store it in a container of your choice!
I like to use glass jars with tight-fitting lids. This will keep the shea butter fresh and allow you to use it whenever you need it.
Read: How long to leave shea butter in hair
Frequently Asked Questions about Whipping Shea Butter
Why Is My Shea Butter Not Whipping?
Shea butter can be stubborn at times and not whip properly. If you have shea butter that consistently refuses to whip, try adding some coconut oil to it.
What Does Whipped Shea Butter Look Like?
If you have been able to whip your shea butter, it should have a fluffy consistency and be light in color. It will have the same texture as lotion or mousse. The whipped shea butter should be pliable and spreadable but not overly runny.
Is Whipped Shea Butter Greasy?
Whipped shea butter is not greasy at all! The main thing that makes shea butter greasy is that it is not whipped correctly. When you whip the shea butter, it becomes light and fluffy – which means there is less of a chance for it to be greasy on your skin.
Adding whipped shea butter to your beauty routine is a great way to keep your skin moisturized and healthy.
Shea butter is known for its many benefits, including reducing inflammation, healing scars and stretch marks, and protecting against the sun’s UV rays.
By following these simple steps of how to whip raw shea butter, you can create your own whipped shea butter at home!

